

After Unstepping the mast in our last video, it's now time to get the rudder removed and see what over 30 years of bluewater crusing can do. It's important f...
Closed Captions (CC):
how's this DMV yeah - takin a nap after
eating a ton of sand yeah it's so much
sand
[Music]
last time on sailing Bala Chandra we
welcome Zeus our newest crewmember and
as part of our prep for Bahamas we
removed the mast hey guys so we're
hauled out of the water you can see here
our bottom paint is still in really good
shape from the last time we did it you
just go back and click on this video you
can watch us doing the bottom paint last
year we caught ourselves some fishing
line well we've got these blades here
which keeps it from getting into our
drop here so another thing to look at
here is our zinc's we were in the water
for up to a year this one here is well
deteriorated this is an aluminum zinc
it's hardly deteriorated at all use
aluminum jigs for fresh water not so
much for saltwater but you can see there
is some pitting here so it was doing
something and I've got a zinc here at
the end of the prop and this one in
particular actually fared really well we
only lost a little bit off the end I
don't know I might consider just leaving
it on there when we launched so yeah
we're going to drop the Rutter today the
main reason we're dropping the rudder is
because we're going to be cruising in
the Bahamas for a long time and I was
told when I bought the boat that the
rudder wasn't in great shape I'm pretty
sure that it's delaminated but it's
definitely a wet rudder and the webbing
inside is made of mild steel which is
super dangerous because if that rots or
rusts and breaks and falls off we lose a
rudder underway really bad idea the guys
here at the club put our rudder just off
the end of the slip here so once I drop
the rudder down there's this space here
but that's not enough to get the rudder
out this whole slip can move because
this is the slip they used to you know
actually launch the boats when this slip
moves we can drop the rudder lower
and get it out so this is the AB sateen
you're a transom right here and this is
probably the best way for me to access
our steering connections and all of my
lines and cables and ropes and stuff
we're stored in here
Here I am inside of my half city near my
transom this is where my rudder shaft is
coming up through the boat and this all
has to be disconnected and this is my
autopilot control arm here and that has
to be disconnected and below here is my
autopilot sensor arm and that has to be
disconnected that bolt right there has
to come off so that the rudder can drop
I went ahead and marked all of the
center points for the autopilot and for
the actual steering column so that no
matter what happens I hopefully won't
have to calibrate anything when I go
back in I've removed all of the steering
stuff and I'm ready to drop the rudder
shaft this is like a bearing that spins
and goes around on this plate and so now
I'm just gonna pop these bearings off
and once that's done it should be free
to drop all right well it took all day
the way these things typically do but I
got my rudder now tied on and I did this
rope that goes across and below kind of
a little basket for the rudder to hold
and that's my car Jack underneath that's
holding the rudder up I had to lift the
rudder slightly just to allow for me to
remove the last bolt and yes there's a
party going on they've been partying
here all all day here at the dock so I'm
ready now to remove the jack and let the
lines take the load of the rudder and
then I'll slowly move the rudder down
and if I don't have enough room to
totally remove the rudder I can lower
the slip and get it down the rest of the
way all right so I got the rudder drop
just by a couple inches here it worked
out okay so the ropes holding this
blocking is holding so the next step is
to drop this slip just a bit and let the
pressure go on the rope
so then I can lower it down using the
ropes which are attached right up here
on my winches all right so we got the
rudder down here it is I just needed a
couple guys to stand on each side to
support it as it came down we didn't get
it on video because I actually had to
help yeah it only took about 20 minutes
to drop it the last little bit the
surprise for me was how much it actually
weighs I mean this rudder is probably
like I'd give it to 300 pounds easy I've
got my rudder out I'm ready to cut it
open and see what I've got inside
no it's wet and I've been told that all
of the webbing inside the framework that
is it welded to the shaft itself is
supposed to be mild steel so let's find
out
[Music]
all right so now that I've cut all along
the edges here and made kind of a window
I've got my pry bar and I'm just getting
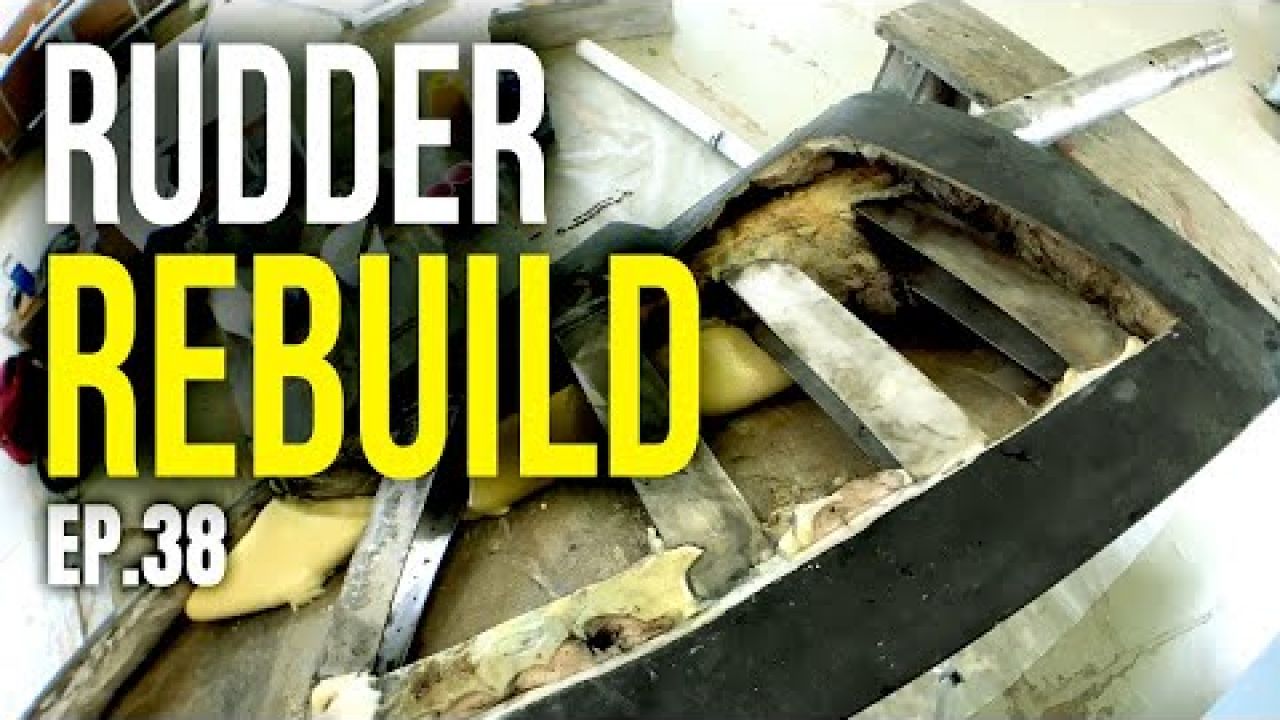
this under here here's the big reveal
Wow
right check this one out okay what we're
looking at here is rigid foam that's
mobile this one here that like that
window insulation foam that you bought
at the hardware store like what's that
doing here
and of course everything's soaking wet
but there's good news and there's bad
news here but good news is the
fiberglass layer looks pretty good like
I mean it's not wet it's not delaminated
so chances are the whole thing has
decent fiberglass left inside which is
great I can use that the other good news
is that these webbings inside appear to
be stainless steel not mild steel I was
told these would be mild steel and that
I would have to get new ones welded on
but from the looks of this they are not
mild steel they're stainless steel which
is what I was hoping for and what I kind
of expected to see so I'm just gonna
clear out all this crappy core fill
refill it with expanding foam and then
rege last this side and I'm done so it
turns out if you're working with
urethane expanding foam you want to have
as little moisture as possible and
roughly 23 degrees Celsius or so some
people were kind enough to let me use
this awesome room here at the club of
where I'm going to be working on my
runner here's the rudder all set up on
sawhorses I was able to use actually the
the jack from my car and did this pretty
much all by myself I have already
removed all the foam as you can see this
stuff here is actually some kind of a
filler whose sanded the inside of this
fiberglass layer just enough to rough it
up so that the foam will bond to the
fiberglass this steel shaft and all of
these webbings were in pretty good shape
actually there was some rusty looking
spots but it was just staining really so
I took a wire wheel and polished up
every part that I could see actually if
you look really closely here you can see
there's a bit
of pitting in the rust but it's not that
bad it's only in a few spots like here
on the shaft and there the weld looks
good no problem there so at this stage
all I need to do is wipe this down with
some acetone to clean up any dust or
grease or debris or whatever might be in
there and get it all ready to go and I
can start mixing up my expanding foam
and pouring it in look who just showed
up hey guys hey Zeus hi come check out
the rudder progress yeah the expanding
foam I'm using is from smooth on it's
called foam at 10 okay with this foam
you use equal parts a and B the first
thing you want to do is shake this up
really good okay start with this one
don't do the same there and you have
about 45 seconds to stir it before it
starts to set up and says sister
rigorously
[Music]
[Music]
okay so I am officially done pouring
foam so you can see that I've already
kind of carved this to a degree I've had
poured all this foam and it overflowed
and everything I took a regular saw like
a wood cutting handsaw and it worked
really well for carving this out and
then I just filled all the low spots
with some more foam so I'll just carve
the rest of these spot file and sand it
down smooth and then I'll be ready to
start doing epoxy and fiberglass work
[Music]
now that I'm done rough carving the foam
using the saw like I need to knock this
part down here a bit and just get that
that perfect curve that I have on the
other side I also need to remove all
this bottom paint and bare your coat
that's on this side there it is so I've
now totally carved and shaped the foam
and it's pretty good match from one side
to the other so I should be able to go
to the next step now which is sealing
this with epoxy and then after that I'll
be adding some filler so that I could
push it into some of these holes you
don't want these air pockets underneath
the glass all right so I've got the
first layer of epoxy done and it's dry I
also took a trowel and spread around
some thickened epoxy so that's epoxy
mixed with 4:04 filler and so now I'm
ready to sand this down I'm going to
clean it with some acetone and then I'm
ready to wet it out and lay some
fiberglass I'm going to be using 18:08
fiberglass which is a really heavy
fiberglass I'm putting down two layers
of that
[Music]
so I'm done the fiberglass so when that
started to get tacky I just went over it
with a bit of thickened epoxy just to
clean up and fill up any little voids or
holes that was left over and so now I'm
ready to do the faring compound and in
order to prep the surface I sanded
everything down and I used acetone to
clean up all the dust and anything that
might be there and I'm ready to apply
this very compound
[Music]
okay so now that one side of the rudder
is finished I'm now working on the other
side and yes this looks like a total
mess I've scraped some of that away and
sanded and gotten right down to some
glass in certain places if you look and
see everything that I have circled these
are spots where holes were drilled and
I'm obviously not the first person to
own this rudder I have no idea what they
were drilled for probably to drain or to
find you know the steel members within
the rudder itself I don't know if they
were filled with epoxy and this one was
filled with teak hard to believe
so I circled them because I'm going to
grind them all out one out of time and
then properly patch them with 105 and
206 epoxy and some my axial cut into
small pieces so I've had a chance to
grind away some of these spots that I
had circled where I want to do some
repairs there ground out little cavities
there yeah I don't know if you can see
these but there's a significant dip
there it's important to have a dip so
that you can get enough glass and
material in there that it does a decent
patch okay so all my patches are dry and
sanded and ready to go I've already
started to throw a faring compound out
I'm going to fare all the rest of the
rudder the other thing I'm about to do
is I'm going to take my dremel and just
grind in here and remove some of this
material just up against where the shaft
goes into the rudder because this is a
spot where a lot of leaks occur on a lot
of boats
I'm not going to grind right through the
full fiberglass layer but I am going to
grind just a little bit in there so I
can throw some G flex epoxy in there
it's a flexible epoxy okay so I used the
Dremel and I got right in here and made
like a nice little groove all the way
around here
now I'm ready to start doing the bottom
pane need to protect mm II barrier code
mixed it up here I'm going to apply it
with a roller
[Music]
well done there's four coats of barrier
code on here it looks really nice time
to put it back on the boat this is very
heavy rudder and there's I can't think
of any way to get it back onto the boat
without doing something elaborate so I'm
gonna build a cradle for the rudder with
wheels on it that you can roll
underneath the back of the boat and then
use a jack to push the butter back up
into the boat I'm gonna see how it goes
yeah mm-hmm all right so here's the
structure I built with the rudder in it
this is all built of two by fours and
there's some casters on it to wheel it
around and it's all braced with the best
engineering I can basically come up with
on my own
I used the spar crane to lift up the
rudder into the air and then lower it
back down into this wooden cradle this
is the slipway about the club and what I
can do is lower this lip which separates
it from where my boat is and where the
cradle is just far enough and it drops
just far enough that I can line up that
hole with the top of the rudder you know
well it Sue's
so if now totally dismantled the cradle
I was using to lift it up because the
cradle was all around it it was in the
way ty came up uh me saying rubber boots
here that's okay I still can work and
only got you more'n just to go next time
on sailing Bala Chandra we get launched
and we finally get assigned our mooring
for the summer we start planning our
trip to the Caribbean and of course
Zeus hey guys thanks for watching if you
haven't become one of our patreon
members yet you really should go and
check it out and see if it's something
you'd like to do we're gonna be posting
a lot of content that we don't post on
YouTube so you'll be able to check that
out especially when we go offshore we're
gonna be posting a lot of really cool
sailing stuff and you know we're gonna
be in the Caribbean if you like our
videos please don't forget to subscribe
and if you want leave a like or a
comment below see you guys later
come on Zeus come on
[Applause]
Zuse gopher haircut tomorrow he's gonna
look very different
Rudder Rebuild | Sailing Balachandra S02E38
Uploaded by:
Cormier Daniel
•
Category:
Boat Building/Maintenance/Repair, Instructional
•
Added on
29 August 2019
Description
After Unstepping the mast in our last video, it's now time to get the rudder removed and see what over 30 years of bluewater crusing can do. It's important f...
Closed Captions (CC):
how's this DMV yeah - takin a nap after
eating a ton of sand yeah it's so much
sand
[Music]
last...
Closed Captions (CC):
how's this DMV yeah - takin a nap after
eating a ton of sand yeah it's so much
sand
[Music]
last...